Sunday, February 21, 2016

Creating a Freeboard for the game


In this video, I will show how the dashboard was created in Freeboard.

I remind you that this example was created to demonstrate the use of Freeboard. Of course, Freeboard is not a tool for gaming development.


This is the basic msg object handled in Node-RED flow.

{
"topic": "none",
"payload": {
"value1": 99,
"value2": 15,
"runs": 1,
"win1": 1,
"win2": 0,
"light1": 1,
"light2": 0,
"light3": 0,
"winner": "open game"
},
"_msgid": "1ffefe4d.e00102"
}


"value1" and "value2" are the random numbers generated in each round and are associated with a Gauge widget.

We use the Text widget for these properties:
"runs" accumulates the number of rounds in the game.
"win1" and "win2" accumulates the number of times each Player scored in a round.
"winner" shows a string with the text "open game". This will change to Player1 or Player2 when the game is over.

The basic idea is to associate a Freeboard widget for each one of the relevant counters from a Node-RED flow.

Light indicator widgets are used to signal the winner of each round or the end of the game. The associated properties in the Red-Node flow are: "light1", "light2" and "light3".

When you access Freeboard the very first step is to create a datasource (we called it GAME). This datasource will appear on the list of available datasources only after you run the flow for the first time. Because we have a node Freeboard in the flow (we called it FREEBOARD-01) the Node-RED server in the cloud will communicate the Freeboard application in the cloud the structure of the msg object. It means that the properties of payload.msg will be available in the datasource.


As a second step, we added three panes in Freeboard.

And finally, we added widgets to each pane.

It is important that at the end of the configuration you save the dashboard and take note of the URL created (saving to your favorites), otherwise, you won't be able to access it later on.


Saturday, February 20, 2016

A game using Node-RED and Freeboard

I wanted to play with some widgets in Freeboard, just for learning purposes. Not having any serious application in mind I came up with the idea of doing something to combine learning + fun. This is a good way to learn, by having fun, isn't?

I have created a Node-RED flow for a computer game.

How the game works: There will be two virtual players "throwing" a virtual dice whose values can range from 0 to 100. The player with the higher number will score one point in each run. The game stops when both players hit the same random number. When this event occurs the player with the higher score is declared the winner.

Freeboard panes and widgets:
One pane for each player with the following widgets. A gauge widget to display the random number. An indicator light widget to easily shows the winner of the run.A text widget that accumulates the score of each player. A separate pane will show how many runs were played at  a given time. An indicator light pane to signal when the game is over. A text widget to show who won the game.


See below a surprising result after running the game several times. It is quite unusual that one player can score much more than the other, but it can happen in the laws of statistics.


At the end of the day, I found that the game was indeed very useful for learning Node-RED since I had to come up with some more advanced functions as well as a logic to start and stop the game. Nothing too complex but also not trivial for a starter.

If you read this post, and the next one,  you will learn a few things:

- How to import flows (created by another people)  into Node-RED
- Use context variable inside your flow
- Use random math function inside a function node
- Use the delay node standard in Red-NODE
- Use three different kinds of widgets in Freeboard

How to import a flow
This is a very handy feature of  Node-RED. You can share your flow with someone else. The point is that the flows are treated as JSON data and can be easily exported and imported.

Let's try. Copy below text.


[{"id":"49f89440.b6076c","type":"inject","z":"1cfb43bd.e304bc","name":"Fire","topic":"none","payload":"fire","payloadType":"string","repeat":"","crontab":"","once":false,"x":80,"y":333,"wires":[["5676f3d1.a9890c"]]},{"id":"43c02113.bc3fe","type":"freeboard","z":"1cfb43bd.e304bc","name":"FREEBOARD-01","x":559,"y":60,"wires":[]},{"id":"db8c93d2.24737","type":"function","z":"1cfb43bd.e304bc","name":"Random","func":"var value1=Math.floor(Math.random()*100);\nvar value2=Math.floor(Math.random()*100);\nvar light1=0;\nvar light2=0;\nvar light3=0;\n\ncontext.global.runs +=1;\nif (value1>value2) {\n context.global.win1+=1\n light1=1;\n light2=0;\n}else if (value2>value1) {\n context.global.win2+=1;\n light1=0;\n light2=1;\n}else {\n light1=1;\n light2=1;\n light3=1;\n context.global.stop = true;\n if (context.global.win1 > context.global.win2) {\n context.global.winner = \"Player 1\";\n } else if (context.global.win2 > context.global.win1) {\n context.global.winner = \"Player 2\";\n } else {\n context.global.winner = \"It is a draw ! !\";\n }\n }\n\nmsg.payload={value1:value1, value2:value2, runs: context.global.runs, win1:context.global.win1, win2:context.global.win2, light1:light1, light2:light2 , light3:light3 , winner:context.global.winner }\nreturn msg;","outputs":1,"noerr":0,"x":340,"y":60,"wires":[["2e899306.d1766c","43c02113.bc3fe"]]},{"id":"2e899306.d1766c","type":"function","z":"1cfb43bd.e304bc","name":"Test Stop","func":"\nif (!context.global.stop) {\n msg.payload = context.global.stop;\n return msg; \n}\n","outputs":1,"noerr":0,"x":362,"y":332,"wires":[["4b15678b.b4ea98"]]},{"id":"4b15678b.b4ea98","type":"delay","z":"1cfb43bd.e304bc","name":"","pauseType":"delay","timeout":"5","timeoutUnits":"seconds","rate":"1","rateUnits":"second","randomFirst":"1","randomLast":"5","randomUnits":"seconds","drop":false,"x":179,"y":62,"wires":[["db8c93d2.24737"]]},{"id":"5676f3d1.a9890c","type":"function","z":"1cfb43bd.e304bc","name":"Start","func":"context.global.start = true;\ncontext.global.stop = false;\n\nif (context.global.start) {\n context.global.win1=0;\n context.global.win2=0;\n context.global.runs=0;\n context.global.winner=\"open game\";\n context.global.start=false;\n}\nreturn msg;","outputs":1,"noerr":0,"x":216,"y":333,"wires":[["2e899306.d1766c"]]}]


Now open your FRED environment, click on the menu icon in the right upper corner of your browser (those 3 stacked lines), select import and then Clipboard.


A dialogue box will open. Paste the text into it.


If all is done correctly the following flow will show up in your canvas.


We are done with the Node-RED part. As for the Freeboard, the process is also very simple but I would rather make a video that shows the process to create the widgets and show the game in action.

I will work on that now.

Take care.


Sunday, February 14, 2016

Node-RED sending data to Freeboard

Sooner you will realize that the node debug is very handy when building your flows. By using this node in different parts of the flow, you will have visibility on how the message is being handled by the flow.

When your goal is to display data for the end user of your solution then, of course, you will need  to rely on a data visualization tool like a dashboard.

I already shared in a previous post that I use an online dashboard called Freeboard.
The Node-RED environment FRED is also hosting an instance of Freeboard dashboard online and FRED has a customized node to send data to Freeboard.

There is more than one way to send data between these applications (Node-RED and Freeboard). In this post, I will show how to use the specific node for Freeboard.

This node is located in the Advanced part of the node palette.


Before we use this node let me say that it is not native to Node-RED. Instead, it was created by a very smart guy that learned how to develop cool and advanced nodes.The node has been made open source and has been added to FRED environment (and can be added to any instance of Node-RED). You can find more on the node developer by checking his blog (click here).


The example I use below was build based on the documentation from Node-RED in IBM site (click here).


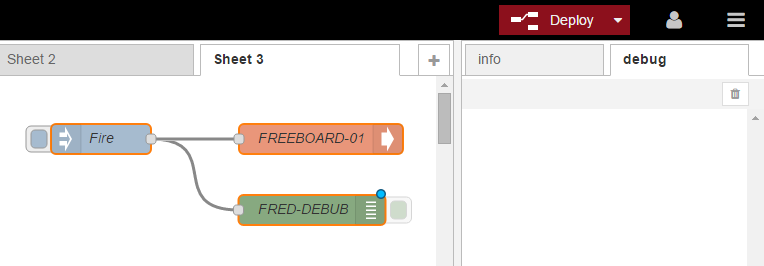
Firstly drop in the canvas the freeboard node; double-click the node and give it a name, like FREEBOARD-01 for instance.


Now add an inject node and configure a string as its payload.


Add also a debug node and wire the three nodes together as shown below.


We are almost  done with Node-RED configuration. Don't forget that you must DEPLOY your flow before you can see it in action. For that purpose click the button DEPLOY.


Now go ahead and test you flow by clicking the inject node (renamed as Fire). You have to see the string "Fire" (or whatever you used as payload in the configuration dialogue) printed in the DEBUG pane. If you left the configuration field OUTPUT as "complete msg object" then you will see all the properties of the object msg. What is important is that your flow is working.


Let's access Freeboard to configure it. Click once the Freeboard node that you added to your canvas. You will see on INFO tab on the right side of FRED the explanation on how this node works. Note that it tells you to open the local Freeboard. In fact local here means the online Freeboard companion to FRED. 


Just click the blue "Freeboard" word in the INFO pane and a new window will open in your browser (or click here) and you will see the following screen.


You are about to make you first dashboard. So, let's go for it.

The first thing to do is to add a DATASOURCE to freeboard. Go ahead and click the small ADD word that appears below the word Datasource in the middle of the screen. A dialog box will appear inviting you to select the new datasource.


Since you added a Freeboard node to Node-RED and already tested it then it is expected that Freeboard will be able to display in the list of available datasources the one you have created. In our case, we named it as FREEBOARD-01.


Select this option in the list and Freeboard will ask you to enter a name for this datasource. Do that and then click on  SAVE.


If all went well then the datasource will be automatically updated in Freeboard.


Next step is to add a pane that will hold as many widgets as you want. You can create several panes and several widgets in each pane. Click in the + ADD PANE and a new pane will appear below.


It is time to add a widget to the pane and you do that by clicking on the plus sign that appears in the top left of the pane.


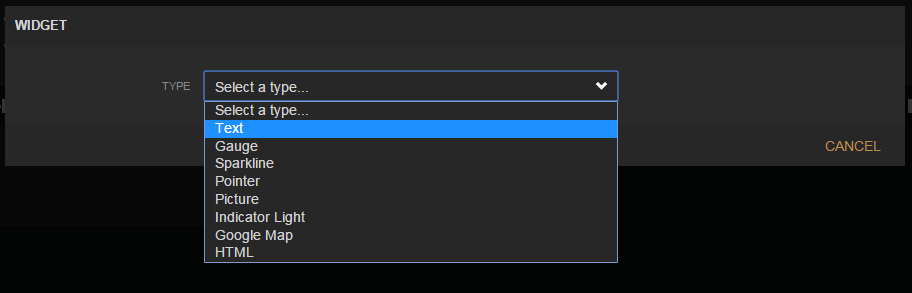
You will be asked to enter the widget type.


We will select the type Text for our first widget.


When Text is select from the list a new dialogue box will appear to allow us to configure the widget. First thing is to give a new for the widget. I used "My First Widget" in the field TITLE.


Now the most critical configuration for this widget. Link the widget to the datasource.

You have to click on  + DATASOURCE in order to make the link.


When you select the datasource shown on above list the field VALUE will be populated with the datasource.


Now to finish the widget configuration click on SAVE

You should see, right away, the word "fire" in you widget.


Go back to Node-RED and change the property payload of the inject node to something else, let's say, "Awesome", DEPLOY the flow (otherwise the change will not make the effect), click on the tab of the inject node to launch the message and see the result in Freeboard.


Maybe we should do an example with the widget Gauge in the next post.

Take care.

Tuesday, February 9, 2016

Node-RED - Messages and Events

Node-RED is so flexible that people can have different views on what the tool does and how it can be useful.

The first thing to keep in mind is that Node-RED is not a programming language. It is an application that uses pieces of code to accomplish what we need.

So, what is the flow that we create when we connect all those nodes together? We know that those nodes are, at the end of the day, small pieces of JavaScript code. What is the purpose of connecting them after all?

Node-RED is a smart tool to process messages and events. This is why it can be so useful in the IOT world.

An event can be anything that can be captured to be processed in the digital world or anything that can be produced and communicated in the digital world.

Some examples of events:

- A light is turned on.
-  An e-mail or twitter or file is sent to someone.
- A record is updated and written to a database.
- A cell is changed in a spreadsheet.
- The temperature sensor in an aquarium generates a new measurement.
- The output pin in a microprocessor changes from low to high.
- This list is endless....


In the IOT world, we want to be able to capture events, process them  and generate communication or control.

Node-RED offers us an easy way to design flows to process messages. Those messages are representations of events.


Let's have a look at the most basic nodes from Node-RED: the input node "inject" (here labelled as timestamp) and the output node "debug" (here labelled as msg).

What kind of message processing does the inject node?

It is simple. It creates in the flow a message with three pieces of information: topic, payload and _msgid.


"topic": "", 
"payload": 1455054618825,
"_msgid": "6a3a8c99.95c574" 
}

This message has a peculiar format that is well known and widely used: JSON format.

It is not a coincidence that the main pieces are named "topic" and "payload". This has an intimate relation with the protocol MQTT.

So, the purpose of this node is to generate a message anytime someone clicks on the left tab in the node icon. For this example, the node was configured to load the computer time inside the message (this is why it was renamed as a "timestamp").

Since I wired this node to the output node "debug" the whole message (three pieces) will be handed over to this second node. This very basic output node will simply display the whole message in the debug window of Node-RED.

As we develop our flow to accomplish a specific task or purpose the message that goes from node to node is changed, processed, communicated, etc.

The flow and the messaging processing will be as complex as your task requires (and hopefully not more complex than really needed).

For basic and simple applications most of the times we will be changing only the payload of the object message (msg).

In Javascript we call the message an object and the payload is one of its properties.  Normally to refer to the payload of the object msg , we use the dotted notation: msg.payload

This is why in the dialogue box of the debug node you have the option to display msg.payload (or eventually another property if you wish).


So, creating a Node-RED flow requires understanding the problem at hand, abstracting the problem to represent it in the form of objects (messages), define what to do with the message (maybe add information  or store or modify), select the appropriate nodes from the library (or create new ones or augment the existing ones) and how to wire them together and finally define the way to communicate the messages on the internet (protocol and application).


IOT course by FutureLearn

I have enrolled in an exciting online IOT course by FutureLearn (click here).

The focus is on the entrepreneurial side of IOT, which is great for me.  Technical material is provided as additional (optional) study material.


Monday, February 8, 2016

Project Caller ID-IOT - wiring tap my telephone


Yes, this is idiot correct. I will let you monitor who is calling my phone line.

I will explain below how to setup your Node-Red environment to subscribe to a public MQTT broker server and listen to the messages that show who is calling my phone number.


So, follow these steps:


1- Create an account in FRED. This will be your Node-Red front end. It is free. Click here and select "Register NOW" or  here to create your account.


2- Enter in your Node-Red instance and you will see the online Node-Red environment provided by Sense Tecnic. This is your workspace for learning Node-Red.


3- We will replicate the flow shown above. It has only two nodes. This is all you need to receive caller ID numbers from my phone line.

First, drag and drop an MQTT from the input panel (left side) to the canvas.


Double click this node and fill the dialog box with this information:

Topic: ocm/caller/2300
Name: Caller ID-IOT


It is missing to configure the Broker field. Click on the "pencil" to edit this field and the following additional dialog box will show up:


Configure as follows:

Broker: broker.mqttdashboard.com
port: 1883
Client ID:  type a random sequence of characters. Just don't use the same client ID shown in the above picture to avoid breaking my connection.

Username and Password: leave blank


If all went well then you configured a Node-Red node as an MQTT subscriber.


4- Drag and drop a debug node to the canvas. This is the very first node that appears in the left pane in the category Output.


Double click this node and fill the dialog box with this information:


The only field to change is the last one. As a matter of fact, this is not mandatory.

Name: Display in Debug TAB


5- Now, you will "wire" both nodes together. Left click the small gray box of one node, move your mouse to the gray box of the other node (keeping the mouse button pressed), and release the mouse button. You will see that the orange line will turn to gray.


6- We are done with the configuration. Now you have to click the red button Deploy to activate the configuration.


You should receive, from times to times, a message in the DEBUG tab, on the right side of your screen. These messages are coming from a public server on the internet to your browser. You setup successfully an MQTT connection. Congratulations.


I will explain in the next post the MQTT connection.


Sunday, February 7, 2016

First Node-RED Practice- Retrofitting a caller ID

"Retrofitting refers to the addition of new technology or features to older systems."


This project aims to add a new capability to an old phone caller ID: connect it to the internet. 

The idea is to push a notification to my smartphone when someone is calling my landline. The essence of this project is to transmit the caller ID to a remote device.

The question is: Why not to simply redirect the calls to a cell phone?  It is just a matter of subscribing to the "follow me" service offered by the carrier. Because this is a fake project. It is just an excuse to learn and practice how to handle the messaging required.

As it seems a rather idiot idea lets name the project accordingly: the caller ID-IOT

Can you picture this situation?  Someone calls your home. You return the call half a minute later saying that you are miles away from home and could not take the call. Most likely the person will react by saying: Don't call me an idiot.

The first step is to name the project (done) and the second one is to brand it. So below logo seems to fit well.


Finally, in the next post, I will exercise with the several ways to play with messages in Node-RED.  Stay tuned.


Selecting a Dashboard for IOT

In many IOT solutions, it will be necessary to have a way to visualize the data gathered from the "things". Based on this information you will know what is going on in your environment, will be able to take decisions and intervene when some action is required. The best tool for such visualization is a dashboard. This is a piece of software that you don't need to develop as there are many solutions readily available for you to choose.There are many different criteria for selecting a dashboard, including (but not limited to): communication capabilities, design, price, general capabilities, easy of configuration and deployment, amount of "widgets" available, etc.

I have chosen Freeboard.  It is open source and can be hosted on your own computer. Alternatively, you can use the online environment hosted on http://freeboard.io (click here).  Freeboard can be easily integrated with Node-Red,  has an appealing design and can be augmented with new datasources and widgets (these ones built with JavaScript):

I will come back many times to Freeboard in future posts. For the time being I am still assessing its capabilities. In just a couple of days, I was able to clone, change and create several dashboards.


Javascript Learning Progress

Well, the first achievement has been completed in just 20 days:  JavaScript course from CodeAcademy. Not too bad considering that I can spare free time only in the night.  My evaluation is that CodeAcademy is an awesome tool for learning a programming language. It provides a hands-on environment where the student can do real coding in a very easy way. The amount of theory is kept to a minimum.

Of course, this is the very first step on mastering JavaScript. There is a long road ahead. I will focus now on Udemy Node.JS courses as well as on YouTube videos.


Thursday, February 4, 2016

Recommended Blogs


I want to show in this post people that are doing great work in this field of IOT and red node.

What they do is inspiring and helpful.  I admire those guys for their level of knowledge, hard work, smart ideas and for sharing what they know and what they do.


Andreas Spiess- YouTube Channel (click here)

Following this channel is a must for those who like or work in IOT field. The "guy with Swiss accent" offers insightful videos in a very didactic way.


Primal Cortex´s Weblog  (click here)


What amazing blog:  extremely well written and easy to understand. Many posts on Node-RED, Odroid, Linux, ESP8266 and their firmware (Sming and node MCU), MQTT and much, much more.


Scargill's Tech Blog (click here)


Another master in the field. His blog is plentiful of information on Node-RED, raspberry, home automation, ESP8266, hardware review, IOT and much more stuff that makers love to do. Peter has also a channel on Youtube (click here).


Node-Red Programming Guide (click here)


By the time of this writing, this is the best tutorial on the web. This is a work in progress, containing seven lectures and other two under development. The tutorial is offered by Sense Tecnic, the creators of FRED environment (click here).  I use the lecture to practice in the FRED environment (click here).