Tuesday, December 12, 2017

Using Node-RED to calculate the amount of days left from today to a future date and publish the result in an MQTT topic

This topic was asked in Google Node-RED discussion group. 


The requirement was quite simple and well explained:

Create a node red function that will be triggered once a day by an inject node. This function should return a simple text message with the days left from now until a specified date in the future. The result from this function will be sent to an MQTT topic.

I found it an interesting exercise and proposed the following solution:


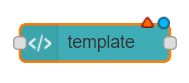
The function node named Initialize will do the calculation for the days left from today until a date in the future. This date in the future is hard-coded inside the javascript code. The key statement is assigning to the variable "d" the date in the proper format. For that purpose, it is used the javascript function new Date. Check https://www.w3schools.com/js/js_dates.asp to better understand the date format in Javascript.


This is the javascript code inside the function Initialize:


// Hardcode the future date - Example: 08-May-2018
// Date(year, month, day, hour, minute, second,  millisecond)
// Jan =0, Feb = 1, Mar=2, etc..

var d = new Date(2018, 4, 8, 0, 0, 0, 0);

// Calculate days left from today until future date
var daysLeft;
daysLeft = Math.floor((d-msg.payload)/(1000*60*60*24));

// send formated msg to node MQTT
msg={topic:"reminder/date", payload:daysLeft};
return msg;


The Initialize node assigns to the property Topic the value "reminder/date" which will be used by MQTT output node that accesses the public (and free) MQTT broker HiveMQ.


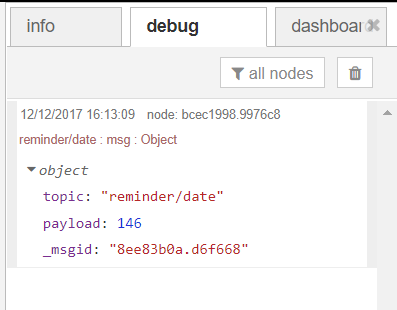
The debug node helps to check the working of the flow. It shows for instance that from today (Dec, 12th) it is missing 146 days until May 8th (2018), which is the date hard coded.


Here the full flow to be imported into Node-RED:


[{"id":"d4275afd.734df8","type":"mqtt out","z":"46e18adc.8d3cc4","name":"","topic":"","qos":"2","retain":"false","broker":"e7401ab8.4a07d8","x":470,"y":80,"wires":[]},{"id":"157a1549.c7ac0b","type":"inject","z":"46e18adc.8d3cc4","name":"","topic":"","payload":"","payloadType":"date","repeat":"","crontab":"","once":false,"x":160,"y":140,"wires":[["8412dbe9.287618"]]},{"id":"8412dbe9.287618","type":"function","z":"46e18adc.8d3cc4","name":"Initialize","func":"// Hardcode the future date - Example: 08-May-2018\n// Date(year, month, day, hour, minute, second,  millisecond)\n// Jan =0, Feb = 1, Mar=2, etc..\nvar d = new Date(2018, 4, 8, 0, 0, 0, 0);\n// Calculate days left from today until future date\nvar daysLeft;\ndaysLeft = Math.floor((d-msg.payload)/(1000*60*60*24));\n// send formated msg to node MQTT\nmsg={topic:\"reminder/date\", payload:daysLeft};\nreturn msg;","outputs":1,"noerr":0,"x":320,"y":140,"wires":[["bcec1998.9976c8","d4275afd.734df8"]]},{"id":"bcec1998.9976c8","type":"debug","z":"46e18adc.8d3cc4","name":"","active":true,"console":"false","complete":"true","x":470,"y":140,"wires":[]},{"id":"e7401ab8.4a07d8","type":"mqtt-broker","z":"","broker":"broker.hivemq.com","port":"1883","clientid":"","usetls":false,"compatmode":true,"keepalive":"60","cleansession":true,"willTopic":"","willQos":"0","willPayload":"","birthTopic":"","birthQos":"0","birthPayload":""}]


Node-RED Dashboard - Button versus Template node

As mentioned in the previous post, Node-RED has a set of nodes to allow one to develop dashboard panels and one of these nodes is the button node.


When used it will produce a standard button on the dashboard. The button design is not very appealing indeed.


While browsing the Node-RED Google group I came across a post that shows how to create a fancier button using another node from the dashboard: the Node Template.


This node allows to format a widget in the dashboard using  HTML, CSS (Cascading Style Sheets), Angular JS directives, SVG directives and therefore requires some specific configuration. The design of your widget will be limited by your imagination and of course your level of knowledge of those technologies.

It will toggle the text (from OPEN to CLOSED) and the colors (from green to red) when clicked.


Below a screenshot of the configuration added to the Template field in the configuration page of the node:


Above screenshot will not show the full configuration so I copy and pasted below:


<md-button class="vibrate filled touched bigfont rounded" style="background-color:#333333" ng-click="send({payload: msg.payload })">


<svg  width="260px" height="90px" version="1.1" viewBox="0 0 800 200">
 <g id="Button_Long">

  <rect fill="#333333" width="800" height="200"/>
  <g ng-style="{fill: (msg.payload || 0) ? 'lime' : 'red'}">
    <rect width="800" height="200" rx="80" ry="80"/>
  </g>

  <rect fill="#333333" x="11" y="10" width="778" height="180" rx="90" ry="90"/>
  <g ng-style="{fill: (msg.payload || 0) ? 'lime' : 'red'}">

    <text x="400" y="125" style="text-anchor:middle"  font-weight="bold" font-size="80" font-family="Arial">{{(msg.payload||0)? " OPEN " : "CLOSED"}} </text>
    </g>
  </g>
</svg>

</md-button>


Now the Node-Red flow. It is very simple. Just a function node to change the payload from true to false and the Template node to format the button in the dashboard.


[{"id":"53c6d477.fca0dc","type":"function","z":"c613eed5.ed874","name":"","func":"msg.payload =!msg.payload; \nreturn msg;\n","outputs":1,"noerr":0,"x":170,"y":80,"wires":[["5a829a9b.a41c64"]]},{"id":"5a829a9b.a41c64","type":"ui_template","z":"c613eed5.ed874","group":"70abbb93.b66df4","name":"OPEN-CLOSED SIGN","order":0,"width":"6","height":"2","format":"<md-button class=\"vibrate filled touched bigfont rounded\" style=\"background-color:#333333\" ng-click=\"send({payload: msg.payload })\"> \n\n\n<svg  width=\"260px\" height=\"90px\" version=\"1.1\" viewBox=\"0 0 800 200\">\n <g id=\"Button_Long\">\n  \n  <rect fill=\"#333333\" width=\"800\" height=\"200\"/>\n  <g ng-style=\"{fill: (msg.payload || 0) ? 'lime' : 'red'}\">\n    <rect width=\"800\" height=\"200\" rx=\"80\" ry=\"80\"/>\n  </g>\n  \n  <rect fill=\"#333333\" x=\"11\" y=\"10\" width=\"778\" height=\"180\" rx=\"90\" ry=\"90\"/>\n  <g ng-style=\"{fill: (msg.payload || 0) ? 'lime' : 'red'}\">\n      \n    <text x=\"400\" y=\"125\" style=\"text-anchor:middle\"  font-weight=\"bold\" font-size=\"80\" font-family=\"Arial\">{{(msg.payload||0)? \" OPEN \" : \"CLOSED\"}} </text>\n    </g>\n  </g>\n</svg>\n\n\n</md-button>\n","storeOutMessages":false,"fwdInMessages":false,"templateScope":"local","x":160,"y":200,"wires":[["53c6d477.fca0dc","925ffb0a.fbb218"]]},{"id":"925ffb0a.fbb218","type":"debug","z":"c613eed5.ed874","name":"","active":true,"console":"false","complete":"false","x":410,"y":200,"wires":[]},{"id":"70abbb93.b66df4","type":"ui_group","z":"","name":"Control Panel","tab":"4ce637e8.4ba768","order":2,"disp":true,"width":"8"},{"id":"4ce637e8.4ba768","type":"ui_tab","z":"","name":"Button Panel","icon":"dashboard"}]