Sunday, June 19, 2016

Wio Link Nodes using Grove modules for Node RED

It took no time for a skillful programmer (Robert Brown) to create a customized set of nodes for Wio Link in Node-RED.

The documentation is available on GitHub: https://github.com/WarriorRocker/node-red-contrib-wio-seeed

Since the package has been uploaded to NPM he installation is as easy as typing the following command in your computer with Node-RED.

$ npm install node-red-contrib-wio-seeed

Below the results from the installation on my ODROID.

odroid@odroid:~$ nvm use 4.2.6
Now using node v4.2.6 (npm v2.14.12)
odroid@odroid:~$ node -v
v4.2.6
odroid@odroid:~$ npm -v
2.14.12
odroid@odroid:~$ npm install node-red-contrib-wio-seeed
|
> websocket@1.0.23 install /home/odroid/node_modules/node-red-contrib-wio-seeed/node_modules/websocket
> (node-gyp rebuild 2> builderror.log) || (exit 0)

make: Entrando no diretório `/home/odroid/node_modules/node-red-contrib-wio-seeed/node_modules/websocket/build'
  CXX(target) Release/obj.target/bufferutil/src/bufferutil.o
  SOLINK_MODULE(target) Release/obj.target/bufferutil.node
  COPY Release/bufferutil.node
  CXX(target) Release/obj.target/validation/src/validation.o
  SOLINK_MODULE(target) Release/obj.target/validation.node
  COPY Release/validation.node
make: Saindo do diretório `/home/odroid/node_modules/node-red-contrib-wio-seeed/node_modules/websocket/build'
node-red-contrib-wio-seeed@0.1.6 node_modules/node-red-contrib-wio-seeed
├── https@1.0.0
├── url@0.11.0 (punycode@1.3.2, querystring@0.2.0)
├── path@0.12.7 (process@0.11.5, util@0.10.3)
└── websocket@1.0.23 (yaeti@0.0.4, nan@2.3.5, typedarray-to-buffer@3.1.2, debug@2.2.0)


Running Node-RED after installing Wio Link package:

odroid@odroid:~$ node-red -v

Welcome to Node-RED
===================

19 Jun 22:43:58 - [info] Node-RED version: v0.13.1
19 Jun 22:43:58 - [info] Node.js  version: v4.2.6
19 Jun 22:43:58 - [info] Loading palette nodes
19 Jun 22:44:03 - [warn] ------------------------------------------
19 Jun 22:44:03 - [warn] [rpi-gpio] Info : Ignoring Raspberry Pi specific node
19 Jun 22:44:03 - [warn] ------------------------------------------
19 Jun 22:44:03 - [info] Settings file  : /home/odroid/.node-red/settings.js
19 Jun 22:44:03 - [info] User directory : /home/odroid/.node-red
19 Jun 22:44:03 - [info] Flows file : /home/odroid/.node-red/flows_odroid.json
19 Jun 22:44:03 - [info] Server now running at http://127.0.0.1:1880/
19 Jun 22:44:03 - [info] Starting flows
19 Jun 22:44:03 - [info] Started flows

Then opening Node-RED in the browser it is possible to see that 9 nodes have been added to the node palette.


I will test today the node SENSOR.

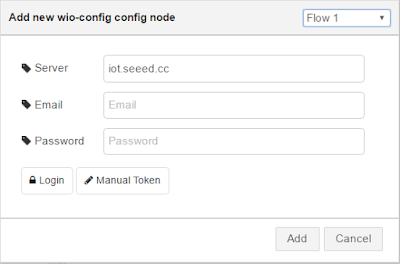
After dragging the sensor node to the flow canvas and double-clicking it the following dialog window will appear.


Next action is to enter your email and password in the respective fields. Those are the same ones that you use on the WioLink app.

When you click the button Login the node will automatically issue an http request to Wio Link exchange server and will return the following dialog box with your user token.


I just clicked the Add button to move on. A new dialog box will magically appear with the config of the Grove modules connected to your board.

It is amazing that the Port field will know what are the sensors currently connected to your board. The Method field also knows what functionality is available for each sensor.


I created then the following basic flow.


I deployed the flow and tested twice using different Output options: Parse value and Raw Object and got the following results in the debug window:


I have to say that I am impressed with the ease of use and with the smart logic that dynamically learns the sensors that are connected to the board as well as the methods available for each sensor.


Wednesday, June 8, 2016

WIO Link and Node-RED websockets

This is an update for this old post (updated on 24-Dec-2017).

I wanted to test the Grove modules that can interact with WebSockets in Node-RED.

The WebSocket capability allows you to monitor those modules in real-time for events. As soon as an event takes place the module itself will send a notification to the SEEED exchange server and therefore to any WebSocket that is listening to those events.


We can discover how many grove modules are supported by SEED by using the API "scan drives". The result of this HTTP request will be quite long (greater than 70k bytes of text) so it is necessary to transform the JSON result with the JSONata expression on JSONata exerciser webpage:

drivers{$string(ID):GroveName}

to get this list:

{
  "0": "Grove-Moisture",
  "1": "Grove-Recorder",
  "2": "Grove - Hall Sensor",
  "3": "Grove-Servo",
  "4": "Grove-Relay",
  "5": "Grove - Loudness Sensor",
  "6": "Grove - Infrared Receiver",
  "7": "Grove - UV Sensor",
  "8": "Grove-IR Distance Interrupter",
  "9": "Grove - Luminance Sensor",
  "10": "Generic Analog Input",
  "11": "Grove - I2C ADC",
  "12": "Grove - MP3 v2.0",
  "13": "One Wire Temperature Sensor",
  "14": "Grove - Sunlight Sensor",
  "15": "Grove-I2C Motor Driver",
  "16": "Generic UART",
  "17": "Grove-Rotary Angle Sensor",
  "18": "Grove - SPDT Relay(30A)",
  "19": "Grove - Infrared Emitter",
  "20": "Grove - Gesture v1.0",
  "21": "Grove-Electromagnet",
  "22": "Grove-Barometer(BMP085/BMP180)",
  "23": "Grove - Air Quality Sensor",
  "24": "Grove-3Axis Compass",
  "25": "Grove - Temperature Sensor",
  "26": "Grove-Magnetic Switch",
  "27": "Grove - Temp&Humi&Barometer Sensor (BME280)",
  "28": "Generic Digital Input",
  "29": "Grove-3Axis Digital Acc(±1.5g)",
  "30": "Grove - 4-Digit Display",
  "31": "Grove - Encoder",
  "32": "Generic Digital Output",
  "33": "Grove-PIR Motion Sensor",
  "34": "Grove-Button",
  "35": "Grove-EL Driver",
  "36": "Grove-WS2812 LED Strip 60",
  "37": "Grove-Multichannel Gas Sensor",
  "38": "Grove - OLED Display 1.12''",
  "39": "Grove - LED Bar",
  "40": "Generic PWM/Analog Output",
  "41": "Grove-Digital Light",
  "42": "Grove-Solid State Relay",
  "43": "Grove - CO2 MH-Z16",
  "44": "Grove - Sound Sensor",
  "45": "Grove - OLED Display 0.96''",
  "46": "Grove - LCD RGB Backlight",
  "47": "Grove-Speaker",
  "48": "Grove-3-Axis Digital Gyro",
  "49": "Grove - Ultrasonic Ranger",
  "50": "Cytron 13Amp DC Motor Driver - SMD Compatible (MD13S)",
  "51": "Grove - Voltage Divider",
  "52": "Grove-Temperature&Humidity",
  "53": "Grove-Temperature&Humidity Pro",
  "54": "Grove-Dry-Reed Relay",
  "55": "Grove-Barometer(BMP280)",
  "56": "Grove - I2C FM Receiver",
  "57": "Grove - Dust Sensor"
}


Alternatively, it works on the following Node-RED flow with the following expression configured in the JSONata field in the Change node:

msg.payload.drivers{$string(ID):GroveName}


[{"id":"f9e0cd3a.9a47c","type":"inject","z":"a9e35387.ccf05","name":"email+password","topic":"","payload":"email=XXX&password=YYY","payloadType":"str","repeat":"","crontab":"","once":false,"x":120,"y":80,"wires":[["89dc065f.b354e8"]]},{"id":"6174bb14.39d664","type":"debug","z":"a9e35387.ccf05","name":"","active":true,"console":"false","complete":"true","x":850,"y":80,"wires":[]},{"id":"89dc065f.b354e8","type":"function","z":"a9e35387.ccf05","name":"User Login","func":"msg.url=\"https://us.wio.seeed.io/v1/user/login?\"+msg.payload;\nmsg.payload=\" \";\nmsg.method=\"POST\";\nreturn msg;","outputs":1,"noerr":0,"x":310,"y":80,"wires":[["e02efc95.ab5d4"]]},{"id":"e02efc95.ab5d4","type":"http request","z":"a9e35387.ccf05","name":"HTTP Request","method":"use","ret":"obj","url":"","x":496.9971466064453,"y":80.88922119140625,"wires":[["102e5dd3.016402"]]},{"id":"b1fd43af.51f1b","type":"function","z":"a9e35387.ccf05","name":"User Scan Drivers","func":"msg.url=\"https://us.wio.seeed.io/v1/scan/drivers\"; \nmsg.method=\"GET\";\nmsg.headers = {\"Authorization\": global.get(\"user_token\")};\nmsg.payload=\"\";\nreturn msg;","outputs":1,"noerr":0,"x":290,"y":200,"wires":[["3aea3549.07b8da"]]},{"id":"3aea3549.07b8da","type":"http request","z":"a9e35387.ccf05","name":"HTTP Request","method":"use","ret":"obj","url":"","tls":"","x":501.1419677734375,"y":199.21304321289062,"wires":[["9772c89e.680898"]]},{"id":"102e5dd3.016402","type":"function","z":"a9e35387.ccf05","name":"Store user_token","func":"global.set(\"user_token\",msg.payload.token)\nreturn msg;","outputs":1,"noerr":0,"x":694.8493804931641,"y":79.5823974609375,"wires":[["6174bb14.39d664"]]},{"id":"23344e4c.1a8f42","type":"inject","z":"a9e35387.ccf05","name":"Fire","topic":"","payload":"","payloadType":"str","repeat":"","crontab":"","once":false,"x":97.14491271972656,"y":200.14199829101562,"wires":[["b1fd43af.51f1b"]]},{"id":"5911271b.728448","type":"debug","z":"a9e35387.ccf05","name":"","active":true,"console":"false","complete":"true","x":730,"y":200,"wires":[]},{"id":"9772c89e.680898","type":"change","z":"a9e35387.ccf05","name":"","rules":[{"t":"set","p":"payload","pt":"msg","to":"msg.payload.drivers{$string(ID):GroveName}","tot":"jsonata"}],"action":"","property":"","from":"","to":"","reg":false,"x":620,"y":340,"wires":[["5911271b.728448"]]}]


Now to filter only those who support WebSockets, we use the following JSONata filter on JSONata exerciser webpage::

drivers[HasEvent]{GroveName:HasEvent}


The outcome shows that there are 9 of them (excluding the generic one) supporting WebSockets.


{
  "Grove - Hall Sensor": true,
  "Grove - Infrared Receiver": true,
  "Grove-IR Distance Interrupter": true,
  "Generic UART": true,
  "Grove - Gesture v1.0": true,
  "Grove-Magnetic Switch": true,
  "Generic Digital Input": true,
  "Grove - Encoder": true,
  "Grove-PIR Motion Sensor": true,
  "Grove-Button": true
}


I have only one module in my bench that works with WebSockets: the Grove Button.

So I will use it for testing the WebSocket node from Node-RED.


Explanation of the Node-RED flow:

The inject node will hold the node token in the payload field:


This inject node will be wired to an output web socket node. This node will handle the handshake to open the WebSocket on the server and will send the payload with the node token. The field Type has to be configured as " Connect to". You will click on the pencil icon on the URL field to add the following WebSocket endpoint:

wss://iot.seeed.cc/v1/node/event


Update: 24-Dec-2017

Notice that the exchange server changed from iot.seed.cc to  us.wio.seeed.io


Then you will add an input Node-RED node that will be configured exactly like the previous one. This node will receive notifications from the exchange server.

Finally, there will be a debug node to show the results in the debug pane of FRED.


Testing:

Of course, you have first to visually program the setup in your app (Android or IOS) and load the firmware.

Whenever you press the button on your board you will see a debug message in Node-RED displaying the alert that the bottom has been pressed.

Just showing "button pressed" in the debug of Node-RED is too simplistic. Maybe you want to send to an MQTT broket or Dweet the event or build some logic in Node-REd that trigger some other action. It is up to your imagination.


Here is the flow to copy and paste to your Node-RED:


[{"id":"356f667e.5f3afa","type":"websocket-client","z":"2f43f52c.5f5eba","path":"wss://iot.seeed.cc/v1/node/event","wholemsg":"false"},{"id":"7b2c2f4e.22df","type":"websocket out","z":"378ba411.6c39fc","name":"","server":"","client":"356f667e.5f3afa","x":468.09942626953125,"y":73.09091186523438,"wires":[]},{"id":"3cea87fa.149c38","type":"inject","z":"378ba411.6c39fc","name":"","topic":"","payload":"a1ad1dfa6dc7726333d49962dde5599a","payloadType":"str","repeat":"","crontab":"","once":false,"x":136.09661865234375,"y":71.51419067382812,"wires":[["7b2c2f4e.22df"]]},{"id":"8ad40f70.4ab6c","type":"websocket in","z":"378ba411.6c39fc","name":"","server":"","client":"356f667e.5f3afa","x":230.08810424804688,"y":171.59945678710938,"wires":[["5c703398.b865bc"]]},{"id":"5c703398.b865bc","type":"debug","z":"378ba411.6c39fc","name":"","active":true,"console":"false","complete":"true","x":533.0880432128906,"y":169.64773318393156,"wires":[]}]


Sunday, June 5, 2016

Wio Link using Freeboard

This post shows how quick and easy is to use Node-RED along with Freeboard and Wio Link. The dashboard shown below was created in less than 3 hours (coffee break time included). It displays the temperature and humidity for the Grove sensors connected to Wio Link.


The Node-RED flow is quite simple. Only a few nodes.


Let me share with you what is interesting in this flow.

First off all a Freeboard node has been added with the name "Wio Link". This kind of node has no parameters at all. It just send to Freeboard environment the JSON object received in its input. What makes this datasource interesting is the payload configured in the inject node. The field Payload in the dialog box of the inject node has been (manually) populated with the result of the HTTP Request "Scan Drivers". The API "Scan Drivers" provides a JSON object that shows all the Grove modules that are eligible to be connected to Wio Link. Some interesting parameters of this object are: a link to a picture of the module and the module name (among many others). The idea of creating this datasource is to build a foundation to easilly add in the dashboard (Freeboard)  any the Grove modules that I want to play with.


For this flow I hard coded the node token as the msg.payload (string format) of the inject node named "Fire" . This string will be used as the value for the "Authorization" property in the HTTP Request. Note that it is necessary to prefix the token itself with the literal "token".


msg.headers = {"Authorization": msg.payload};


I  configured an interval of 5 minutes for pooling the sensor data. It means that every five minutes a new HTTP Request will be sent out to read the data from the sensor.


Two other nodes of type  "Freeboard" have been added to the logic.


They will send to Freeboard the temperature and humidity read by the HTTP Requests.

This is pretty much the Node-Red flow.  I won't be posting the screenshots that show how the dashboard has been configured since this would be very time-consuming. Maybe I will make a video on that and post on my channel on YouTube (as soon as I manage to buy a decent mic to add sound).


Below the flow that can be copied and imported to your Node-RED.


[{"id":"d9820cc8.38e4f","type":"freeboard","z":"1384eb45.4433b5","name":"Wio Link","x":334.9573974609375,"y":61.17897033691406,"wires":[]},{"id":"72bfb467.debd6c","type":"function","z":"1384eb45.4433b5","name":"Grove Temperature","func":"msg.url=\"https://iot.seeed.cc/v1/node/GroveTempHumD0/temperature\"; \nmsg.method=\"GET\";\nmsg.headers = {\"Authorization\": msg.payload};\nreturn msg;","outputs":1,"noerr":0,"x":317.09942626953125,"y":193.09091186523438,"wires":[["c6f1e765.2aca28"]]},{"id":"c6f1e765.2aca28","type":"http request","z":"1384eb45.4433b5","name":"HTTP Request","method":"use","ret":"obj","url":"","x":523.2414245605469,"y":194.30398559570312,"wires":[["d25aefd2.19618","d66d6e73.cec5c"]]},{"id":"d25aefd2.19618","type":"freeboard","z":"1384eb45.4433b5","name":"WioTemp","x":724.0994338989258,"y":194.09091186523438,"wires":[]},{"id":"d66d6e73.cec5c","type":"debug","z":"1384eb45.4433b5","name":"","active":true,"console":"false","complete":"true","x":731.096565246582,"y":288.9801330566406,"wires":[]},{"id":"fa3afc81.28a44","type":"inject","z":"1384eb45.4433b5","name":"Fire","topic":"","payload":"token a1adldfa6dc7726333d49962dde5599b","payloadType":"str","repeat":"300","crontab":"","once":true,"x":102.09943389892578,"y":165.00000095367432,"wires":[["72bfb467.debd6c","3725f37e.dd01dc"]]},{"id":"3725f37e.dd01dc","type":"function","z":"1384eb45.4433b5","name":"Grove Humidity","func":"msg.url=\"https://iot.seeed.cc/v1/node/GroveTempHumD0/humidity\"; \nmsg.method=\"GET\";\nmsg.headers = {\"Authorization\": msg.payload};\nreturn msg;","outputs":1,"noerr":0,"x":304.0994415283203,"y":142,"wires":[["8a212685.066f48"]]},{"id":"8a212685.066f48","type":"http request","z":"1384eb45.4433b5","name":"HTTP Request","method":"use","ret":"obj","url":"","x":522.0994415283203,"y":143,"wires":[["d66d6e73.cec5c","1c70a693.291b39"]]},{"id":"1c70a693.291b39","type":"freeboard","z":"1384eb45.4433b5","name":"Wio Humid","x":732.0994415283203,"y":145,"wires":[]},{"id":"4d3891b2.c7c5f","type":"inject","z":"1384eb45.4433b5","name":"","topic":"","payload":"{ \"drivers\": [ { \"SKU\": \"63e25800-a2d2-11e5-bf7f-feff819cdc9f\", \"GroveName\": \"Generic PWM/Analog Output\", \"ImageURL\": \"http://www.seeedstudio.com/wiki/images/b/b4/Generic_analog_output.png\", \"HasPowerOffFunc\": false, \"ClassName\": \"GenericPWMOut\", \"CanGetLastError\": false, \"HasEvent\": false, \"InterfaceType\": \"GPIO\", \"HasPowerOnFunc\": false, \"ID\": 0 }, { \"SKU\": \"101020019-ffff\", \"GroveName\": \"Grove-Temperature&Humidity\", \"ImageURL\": \"http://www.seeedstudio.com/wiki/images/3/36/Temp%26Humi.jpg\", \"HasPowerOffFunc\": false, \"ClassName\": \"GroveTempHum\", \"CanGetLastError\": false, \"HasEvent\": false, \"InterfaceType\": \"GPIO\", \"HasPowerOnFunc\": false, \"ID\": 1 }, { \"SKU\": \"101020040\", \"GroveName\": \"Grove-IR Distance Interrupter\", \"ImageURL\": \"http://www.seeedstudio.com/wiki/images/thumb/e/e1/IR_Distance_Interrupter.jpg/300px-IR_Distance_Interrupter.jpg\", \"HasPowerOffFunc\": false, \"ClassName\": \"GroveIRDistanceInterrupter\", \"CanGetLastError\": false, \"HasEvent\": true, \"InterfaceType\": \"GPIO\", \"HasPowerOnFunc\": false, \"ID\": 2 }, { \"SKU\": \"7e3306bc-8911-11e5-af63-feff819cdc9f\", \"GroveName\": \"Generic Digital Input\", \"ImageURL\": \"http://www.seeedstudio.com/wiki/images/e/ea/Pion_one_generic_din.png\", \"HasPowerOffFunc\": false, \"ClassName\": \"GenericDIn\", \"CanGetLastError\": false, \"HasEvent\": true, \"InterfaceType\": \"GPIO\", \"HasPowerOnFunc\": false, \"ID\": 3 }, { \"SKU\": \"101020026\", \"GroveName\": \"Grove - Infrared Emitter\", \"ImageURL\": \"http://www.seeedstudio.com/wiki/images/thumb/6/6a/Grove_-_Infrared_Emitter.jpg/400px-Grove_-_Infrared_Emitter.jpg\", \"HasPowerOffFunc\": false, \"ClassName\": \"GroveIREmit\", \"CanGetLastError\": true, \"HasEvent\": false, \"InterfaceType\": \"GPIO\", \"HasPowerOnFunc\": false, \"ID\": 4 }, { \"SKU\": \"3a9d9a84-8c59-11e5-8994-feff819cdc9f\", \"GroveName\": \"Generic Digital Output\", \"ImageURL\": \"http://www.seeedstudio.com/wiki/images/0/00/Pion_one_generic_dout.png\", \"HasPowerOffFunc\": false, \"ClassName\": \"GenericDOut\", \"CanGetLastError\": false, \"HasEvent\": false, \"InterfaceType\": \"GPIO\", \"HasPowerOnFunc\": false, \"ID\": 5 }, { \"SKU\": \"101020003\", \"GroveName\": \"Grove-Button\", \"ImageURL\": \"http://www.seeedstudio.com/wiki/images/thumb/c/ca/Button.jpg/300px-Button.jpg\", \"HasPowerOffFunc\": false, \"ClassName\": \"GroveButton\", \"CanGetLastError\": false, \"HasEvent\": true, \"InterfaceType\": \"GPIO\", \"HasPowerOnFunc\": false, \"ID\": 6 }, { \"SKU\": \"107020001\", \"GroveName\": \"Grove-Speaker\", \"ImageURL\": \"http://www.seeedstudio.com/depot/images/product/Grove%20Speaker_01.jpg\", \"HasPowerOffFunc\": false, \"ClassName\": \"GroveSpeaker\", \"CanGetLastError\": false, \"HasEvent\": false, \"InterfaceType\": \"GPIO\", \"HasPowerOnFunc\": false, \"ID\": 7 }, { \"SKU\": \"101020088\", \"GroveName\": \"Grove-Multichannel Gas Sensor\", \"ImageURL\": \"http://www.seeedstudio.com/wiki/images/2/28/Multi_sensor1.png\", \"HasPowerOffFunc\": false, \"ClassName\": \"GroveMultiChannelGas\", \"CanGetLastError\": true, \"HasEvent\": false, \"InterfaceType\": \"I2C\", \"HasPowerOnFunc\": false, \"ID\": 8 }, { \"SKU\": \"101020078\", \"GroveName\": \"Grove - Air Quality Sensor\", \"ImageURL\": \"http://www.seeedstudio.com/depot/images/product/101020078%201_02.jpg\", \"HasPowerOffFunc\": true, \"ClassName\": \"GroveAirquality\", \"CanGetLastError\": true, \"HasEvent\": false, \"InterfaceType\": \"ANALOG\", \"HasPowerOnFunc\": true, \"ID\": 9 }, { \"SKU\": \"104030008\", \"GroveName\": \"Grove - OLED Display 0.96''\", \"ImageURL\": \"http://www.seeedstudio.com/wiki/images/thumb/e/ea/Toled128642.jpg/400px-Toled128642.jpg\", \"HasPowerOffFunc\": false, \"ClassName\": \"GroveOLED12864\", \"CanGetLastError\": true, \"HasEvent\": false, \"InterfaceType\": \"I2C\", \"HasPowerOnFunc\": false, \"ID\": 10 }, { \"SKU\": \"101020030\", \"GroveName\": \"Grove-Digital Light\", \"ImageURL\": \"http://www.seeedstudio.com/wiki/images/6/69/Digital_Light_Sensor.jpg\", \"HasPowerOffFunc\": false, \"ClassName\": \"GroveDigitalLight\", \"CanGetLastError\": true, \"HasEvent\": false, \"InterfaceType\": \"I2C\", \"HasPowerOnFunc\": false, \"ID\": 11 }, { \"SKU\": \"105020001\", \"GroveName\": \"Grove-I2C Motor Driver\", \"ImageURL\": \"http://www.seeedstudio.com/depot/bmz_cache/3/3ac50a997c78858b8f960475f878e369.image.530x397.jpg\", \"HasPowerOffFunc\": false, \"ClassName\": \"GroveI2CMotorDriver\", \"CanGetLastError\": false, \"HasEvent\": false, \"InterfaceType\": \"I2C\", \"HasPowerOnFunc\": false, \"ID\": 12 }, { \"SKU\": \"107020008\", \"GroveName\": \"Grove - MP3 v2.0\", \"ImageURL\": \"http://www.seeedstudio.com/depot/bmz_cache/e/e0d5fd4cbcface290dc089c29adbf98b.image.530x397.jpg\", \"HasPowerOffFunc\": false, \"ClassName\": \"GroveMP3V2\", \"CanGetLastError\": false, \"HasEvent\": false, \"InterfaceType\": \"UART\", \"HasPowerOnFunc\": false, \"ID\": 13 }, { \"SKU\": \"103020014\", \"GroveName\": \"Grove-Dry-Reed Relay\", \"ImageURL\": \"http://www.seeedstudio.com/depot/bmz_cache/1/16a562af66ac52d6e0e19a7b6ec5588d.image.530x397.jpg\", \"HasPowerOffFunc\": false, \"ClassName\": \"GroveDryReedRelay\", \"CanGetLastError\": false, \"HasEvent\": false, \"InterfaceType\": \"GPIO\", \"HasPowerOnFunc\": false, \"ID\": 14 }, { \"SKU\": \"103020005\", \"GroveName\": \"Grove_Relay\", \"ImageURL\": \"http://www.seeedstudio.com/depot/bmz_cache/d/df3ef3f9ba7f58333235895c0d3c4fb2.image.530x397.jpg\", \"HasPowerOffFunc\": false, \"ClassName\": \"GroveRelay\", \"CanGetLastError\": false, \"HasEvent\": false, \"InterfaceType\": \"GPIO\", \"HasPowerOnFunc\": false, \"ID\": 15 }, { \"SKU\": \"104030001\", \"GroveName\": \"Grove - LCD RGB Backlight\", \"ImageURL\": \"http://www.seeedstudio.com/depot/bmz_cache/2/216a915503836429b7e6b92f83e035d5.image.530x397.jpg\", \"HasPowerOffFunc\": false, \"ClassName\": \"GroveLCDRGB\", \"CanGetLastError\": true, \"HasEvent\": false, \"InterfaceType\": \"I2C\", \"HasPowerOnFunc\": false, \"ID\": 16 }, { \"SKU\": \"101020016\", \"GroveName\": \"Grove - Infrared Receiver\", \"ImageURL\": \"http://www.seeedstudio.com/wiki/images/thumb/e/ee/Grove_-_Infrared_Receiver.jpg/400px-Grove_-_Infrared_Receiver.jpg\", \"HasPowerOffFunc\": false, \"ClassName\": \"GroveIRRecv\", \"CanGetLastError\": false, \"HasEvent\": true, \"InterfaceType\": \"GPIO\", \"HasPowerOnFunc\": false, \"ID\": 17 }, { \"SKU\": \"101020020\", \"GroveName\": \"Grove-PIR Motion Sensor\", \"ImageURL\": \"http://www.seeedstudio.com/depot/bmz_cache/b/bc0115270f17babe6373bce8ec1bfe8a.image.164x123.jpg\", \"HasPowerOffFunc\": false, \"ClassName\": \"GrovePIRMotion\", \"CanGetLastError\": false, \"HasEvent\": true, \"InterfaceType\": \"GPIO\", \"HasPowerOnFunc\": false, \"ID\": 18 }, { \"SKU\": \"104990089\", \"GroveName\": \"Grove-WS2812 LED Strip 60\", \"ImageURL\": \"http://www.seeedstudio.com/depot/bmz_cache/4/4f346dc15724a7b5a5c1383253aeefc9.image.530x397.jpg\", \"HasPowerOffFunc\": false, \"ClassName\": \"GroveLedWs2812\", \"CanGetLastError\": true, \"HasEvent\": false, \"InterfaceType\": \"GPIO\", \"HasPowerOnFunc\": false, \"ID\": 19 }, { \"SKU\": \"101020050\", \"GroveName\": \"Grove-3-Axis Digital Gyro\", \"ImageURL\": \"http://www.seeedstudio.com/wiki/images/thumb/f/f6/Gbgr.jpg/500px-Gbgr.jpg\", \"HasPowerOffFunc\": false, \"ClassName\": \"GroveGyroITG3200\", \"CanGetLastError\": false, \"HasEvent\": false, \"InterfaceType\": \"I2C\", \"HasPowerOnFunc\": false, \"ID\": 20 }, { \"SKU\": \"103020012\", \"GroveName\": \"Grove - SPDT Relay(30A)\", \"ImageURL\": \"http://www.seeedstudio.com/depot/images/product/SPDT%20Relay.jpg\", \"HasPowerOffFunc\": false, \"ClassName\": \"GroveSPDTRelay30A\", \"CanGetLastError\": false, \"HasEvent\": false, \"InterfaceType\": \"GPIO\", \"HasPowerOnFunc\": false, \"ID\": 21 }, { \"SKU\": \"101020039\", \"GroveName\": \"Grove-3Axis Digital Acc(±1.5g)\", \"ImageURL\": \"http://www.seeedstudio.com/wiki/images/b/bb/3_aix_acc.jpg\", \"HasPowerOffFunc\": true, \"ClassName\": \"GroveAccMMA7660\", \"CanGetLastError\": false, \"HasEvent\": false, \"InterfaceType\": \"I2C\", \"HasPowerOnFunc\": true, \"ID\": 22 }, { \"SKU\": \"101020038\", \"GroveName\": \"Grove-Magnetic Switch\", \"ImageURL\": \"http://www.seeedstudio.com/wiki/images/thumb/c/c0/Magnetic_Switch.jpg/400px-Magnetic_Switch.jpg\", \"HasPowerOffFunc\": false, \"ClassName\": \"GroveMagneticSwitch\", \"CanGetLastError\": false, \"HasEvent\": true, \"InterfaceType\": \"GPIO\", \"HasPowerOnFunc\": false, \"ID\": 23 }, { \"SKU\": \"101020192\", \"GroveName\": \"Grove-Barometer(BMP280)\", \"ImageURL\": \"http://www.seeedstudio.com/wiki/images/thumb/a/a4/Bmp280.jpg/610px-Bmp280.jpg\", \"HasPowerOffFunc\": false, \"ClassName\": \"GroveBaroBMP280\", \"CanGetLastError\": false, \"HasEvent\": false, \"InterfaceType\": \"I2C\", \"HasPowerOnFunc\": false, \"ID\": 24 }, { \"SKU\": \"105020005\", \"GroveName\": \"Grove-EL Driver\", \"ImageURL\": \"http://www.seeedstudio.com/depot/bmz_cache/4/45c3a0b2df09759a952ae01bf5207b42.image.530x397.jpg\", \"HasPowerOffFunc\": false, \"ClassName\": \"GroveEL\", \"CanGetLastError\": false, \"HasEvent\": false, \"InterfaceType\": \"GPIO\", \"HasPowerOnFunc\": false, \"ID\": 25 }, { \"SKU\": \"101020019\", \"GroveName\": \"Grove-Temperature&Humidity Pro\", \"ImageURL\": \"http://www.seeedstudio.com/wiki/images/7/75/Temp_humi_pro222.jpg\", \"HasPowerOffFunc\": false, \"ClassName\": \"GroveTempHumPro\", \"CanGetLastError\": false, \"HasEvent\": false, \"InterfaceType\": \"GPIO\", \"HasPowerOnFunc\": false, \"ID\": 26 }, { \"SKU\": \"101020073\", \"GroveName\": \"Grove-Electromagnet\", \"ImageURL\": \"http://www.seeedstudio.com/depot/bmz_cache/9/9509f6e5cb898db66420ae739bb51eb3.image.164x123.jpg\", \"HasPowerOffFunc\": false, \"ClassName\": \"GroveElecMagnet\", \"CanGetLastError\": false, \"HasEvent\": false, \"InterfaceType\": \"GPIO\", \"HasPowerOnFunc\": false, \"ID\": 27 }, { \"SKU\": \"103020018\", \"GroveName\": \"Grove-Recorder\", \"ImageURL\": \"http://www.seeedstudio.com/depot/images/product/Grove%20Recorder.jpg\", \"HasPowerOffFunc\": false, \"ClassName\": \"GroveRecorder\", \"CanGetLastError\": false, \"HasEvent\": false, \"InterfaceType\": \"GPIO\", \"HasPowerOnFunc\": false, \"ID\": 28 }, { \"SKU\": \"104030003\", \"GroveName\": \"Grove - 4-Digit Display\", \"ImageURL\": \"http://www.seeedstudio.com/depot/bmz_cache/3/3a9f79323a82950c12fc7e69fa9fab4d.image.530x397.jpg\", \"HasPowerOffFunc\": true, \"ClassName\": \"Grove4Digit\", \"CanGetLastError\": true, \"HasEvent\": false, \"InterfaceType\": \"UART\", \"HasPowerOnFunc\": true, \"ID\": 29 }, { \"SKU\": \"103020004\", \"GroveName\": \"Grove-Solid State Relay\", \"ImageURL\": \"http://www.seeedstudio.com/depot/bmz_cache/1/13c15e71c4bd4c0a0fce5faa0283f4c5.image.530x397.jpg\", \"HasPowerOffFunc\": false, \"ClassName\": \"GroveSolidStateRelay\", \"CanGetLastError\": false, \"HasEvent\": false, \"InterfaceType\": \"GPIO\", \"HasPowerOnFunc\": false, \"ID\": 30 }, { \"SKU\": \"eedec01c-8c5a-11e5-8994-feff819cdc9f\", \"GroveName\": \"Generic Analog Input\", \"ImageURL\": \"http://www.seeedstudio.com/wiki/images/8/87/Pion_one_generic_analog.png\", \"HasPowerOffFunc\": false, \"ClassName\": \"GenericAIn\", \"CanGetLastError\": false, \"HasEvent\": false, \"InterfaceType\": \"ANALOG\", \"HasPowerOnFunc\": false, \"ID\": 31 }, { \"SKU\": \"101020034\", \"GroveName\": \"Grove-3Axis Compass\", \"ImageURL\": \"http://www.seeedstudio.com/wiki/images/thumb/b/be/Axis_compass.jpg/400px-Axis_compass.jpg\", \"HasPowerOffFunc\": false, \"ClassName\": \"GroveCompass\", \"CanGetLastError\": false, \"HasEvent\": false, \"InterfaceType\": \"I2C\", \"HasPowerOnFunc\": false, \"ID\": 32 }, { \"SKU\": \"101020008\", \"GroveName\": \"Grove-Moisture\", \"ImageURL\": \"http://www.seeedstudio.com/wiki/images/c/ce/Moisture_sensor_.jpg\", \"HasPowerOffFunc\": false, \"ClassName\": \"GroveMoisture\", \"CanGetLastError\": false, \"HasEvent\": false, \"InterfaceType\": \"ANALOG\", \"HasPowerOnFunc\": false, \"ID\": 33 }, { \"SKU\": \"101020083\", \"GroveName\": \"Grove - Gesture v1.0\", \"ImageURL\": \"http://www.seeedstudio.com/depot/images/product/101020083%201_01.jpg\", \"HasPowerOffFunc\": false, \"ClassName\": \"GroveGesture\", \"CanGetLastError\": false, \"HasEvent\": false, \"InterfaceType\": \"I2C\", \"HasPowerOnFunc\": false, \"ID\": 34 }, { \"SKU\": \"101020010\", \"GroveName\": \"Grove - Ultrasonic Ranger\", \"ImageURL\": \"http://www.seeedstudio.com/wiki/images/thumb/3/3a/Ultrasonic_Ranger.jpg/350px-Ultrasonic_Ranger.jpg\", \"HasPowerOffFunc\": false, \"ClassName\": \"GroveUltraRanger\", \"CanGetLastError\": false, \"HasEvent\": false, \"InterfaceType\": \"GPIO\", \"HasPowerOnFunc\": false, \"ID\": 35 }, { \"SKU\": \"101020015\", \"GroveName\": \"Grove - Temperature Sensor\", \"ImageURL\": \"http://www.seeedstudio.com/wiki/images/5/5f/Grove_Temperature_Sensor_View.jpg\", \"HasPowerOffFunc\": false, \"ClassName\": \"GroveTemp\", \"CanGetLastError\": false, \"HasEvent\": false, \"InterfaceType\": \"ANALOG\", \"HasPowerOnFunc\": false, \"ID\": 36 }, { \"SKU\": \"111020001\", \"GroveName\": \"Grove - Encoder\", \"ImageURL\": \"http://www.seeedstudio.com/depot/bmz_cache/0/00a3a97e35f0ede1275ea4a989e4953c.image.530x397.jpg\", \"HasPowerOffFunc\": true, \"ClassName\": \"GroveEncoder\", \"CanGetLastError\": false, \"HasEvent\": true, \"InterfaceType\": \"UART\", \"HasPowerOnFunc\": true, \"ID\": 37 }, { \"SKU\": \"101020032\", \"GroveName\": \"Grove-Barometer(BMP085)\", \"ImageURL\": \"http://www.seeedstudio.com/wiki/images/thumb/e/e7/Grove-Barometer.jpg/621px-Grove-Barometer.jpg\", \"HasPowerOffFunc\": false, \"ClassName\": \"GroveBaroBMP085\", \"CanGetLastError\": false, \"HasEvent\": false, \"InterfaceType\": \"I2C\", \"HasPowerOnFunc\": false, \"ID\": 38 }, { \"SKU\": \"316010005\", \"GroveName\": \"Grove-Servo\", \"ImageURL\": \"http://www.seeedstudio.com/wiki/images/thumb/0/0f/Grove%E2%80%94Servo.jpg/600px-Grove%E2%80%94Servo.jpg\", \"HasPowerOffFunc\": false, \"ClassName\": \"GroveServo\", \"CanGetLastError\": false, \"HasEvent\": false, \"InterfaceType\": \"GPIO\", \"HasPowerOnFunc\": false, \"ID\": 39 }, { \"SKU\": \"104020006\", \"GroveName\": \"Grove - LED Bar\", \"ImageURL\": \"http://www.seeedstudio.com/depot/images/product/104020006%201.jpg\", \"HasPowerOffFunc\": false, \"ClassName\": \"GroveLEDBar\", \"CanGetLastError\": false, \"HasEvent\": false, \"InterfaceType\": \"UART\", \"HasPowerOnFunc\": false, \"ID\": 40 }, { \"SKU\": \"101020017\", \"GroveName\": \"Grove-Rotary Angle Sensor\", \"ImageURL\": \"http://www.seeedstudio.com/depot/bmz_cache/4/47c18125fbb4c9db7e3104f5a3b04ef5.image.530x397.jpg\", \"HasPowerOffFunc\": false, \"ClassName\": \"GroveRotaryAngle\", \"CanGetLastError\": false, \"HasEvent\": false, \"InterfaceType\": \"ANALOG\", \"HasPowerOnFunc\": false, \"ID\": 41 } ] }","payloadType":"json","repeat":"","crontab":"","once":true,"x":93.95454406738281,"y":66.88067626953125,"wires":[["d9820cc8.38e4f"]]}]

Saturday, June 4, 2016

WIO Link - HTTP Requests from Node-RED


Seeedstudio deployed two exchange servers that expose APIs for communicating with WioLink boards. I am using the international server from US and can tell you that the response time is awesome.

https://us.wio.seeed.io
https://cn.wio.seeed.io


There is a comprehensive API guide on Seedstudio webpage. It can be visited by clicking on this link.


I will share some flows that I have used to test the communication via API.

When testing API is very helpful to use a tool like postman or insomnia

You will need a running Node-RED instance and again I suggest you to try FRED to keep things easy. I will assume you already have a WIO Link board online with some Grove module connected. For this post I am using the temperature and humidity sensor.

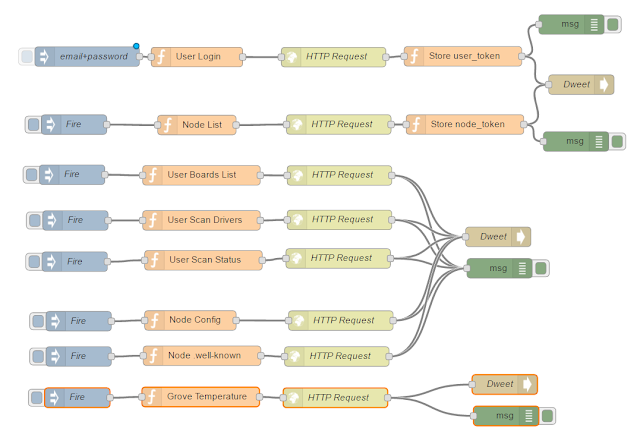
I have built flows to test 8 different APIs and all of them works in the same general way:

An inject node will launch the flow.
A function node will prepare the required properties in the msg object.
The  HTTP Request node will send the requests to the exchange server.
The result will be displayed in the debug node of Node-RED and also sent via Dweet to allow you to better visualize the results in a web page.


I remind you that it is necessary to use two different tokens when playing with WioLink APIs.  One of them is the user token and is required by some APIs (Eg. to log in, retrieve the password and change the password). The other token is the node token and it is used by the APIs that read and write to the Grove modules (sensors and actuators).

The first flow depicted above will test the API "User Login". As a result, it will provide the user token that was assigned when you created your login in the app (Android or IOS).  This user token will be stored in a global variable in Node-RED. Storing the token will make easier testing another API´s.

In order to test your WioLink board with these flows, you will need to modify the parameters in the dialog box of the inject node "email + password" by using the same data that you informed when configuring your board in the app.


The second flow will test the API "Node List" that lists the WIO Link boards configured under your account. This flow also stores the node token of the first WIO Link (the flow need to be modified if you have more than one WioLink board).

Before you can test the other flows you must first trigger these two initial flows. The reason, like I said before, is that we need to store the user token and the node token before using the next flows. You can play with the flows and modify them to suit your purposes and, if you want, you can hardcode your tokens in the nodes.

The next three flows require the user token and will test the APIs: Boards List, Scan Drivers, and Scan status. Note that the Scan Drivers result in a quite long reply and therefore it will not work with Dweet that limits the payload of the message to 2.000  characters.

The following two APIs are: Node config and Node .well known.

Finally, the last API test the temperature and humidity sensor.


Understanding the nodes used in the flows:

Node-RED can easily access WIO Link exchange servers (in fact any HTTP server) thanks to the function node "HTTP Request".


My choice was not to configure the parameters in the dialog box of the HTTP Request node. When we leave the parameters blank in the configuration box it means that the node expects to receive a msg object from the previous node with some properties configured in advance.

Those properties are:
msg.url
msg.method
msg.headers
msg.payload


Below picture shows that "HTTP Request" dialog boxes have not been configured.


In my flows, I have inserted a  "function" node before each  "HTTP Request" node. Those function nodes are responsible to set up the msg properties with the right values.


Below picture shows how the function node is configured for one of the flows. Note the way to set up and read global variables in Node-RED by using the functions: global.set() and global.get().


Using Dweet.io  is straightforward. The good thing about this environment is that it requires no login and not set up. You just send the information to their servers and read the results in a web browser.

I configured the Dweet node as below.


In such case, I will read the results on this link:

https://dweet.io/get/latest/dweet/for/my-wio

You better to select another "Thing" name, instead of "my-wio" to avoid getting confused by reading my own dweets.


See the results I got from Dweet for the APIs:


{"this":"succeeded","by":"getting","the":"dweets","with":[{"thing":"my-wio","created":"2016-06-04T22:07:48.193Z","content":{"token":"PPxxPQlS7gwSLfwsQyYO9ZxRwq9EuLodP2swG2SpNsaY","user_id":1829}}]}


{"this":"succeeded","by":"getting","the":"dweets","with":[{"thing":"my-wio","created":"2016-06-04T22:11:04.226Z","content":{"nodes":[{"name":"AIOT","node_key":"a1adldfa6dc7726333d49962dde5599b","node_sn":"1c754d28816062345523164b75ccd147","dataxserver":null,"board":"Wio Link v1.0","online":true}]}}]}


{"this":"succeeded","by":"getting","the":"dweets","with":[{"thing":"my-wio","created":"2016-06-04T21:51:16.758Z","content":{"boards":[{"board_flash_spi_mode":"QIO","board_builtin":{"FUNCTION_KEY":0,"STATUS_LED":2,"GROVE_POWER_SWITCH":15},"interfaces":{"UART0":{"pintx":1,"pinrx":3,"type":"UART"},"D2":{"type":"GPIO","pin":13},"A0":{"type":"ANALOG","pin":17},"I2C0":{"pinscl":5,"type":"I2C","pinsda":4},"D0":{"type":"GPIO","pin":14},"D1":{"type":"GPIO","pin":12}},"board_name":"Wio Link v1.0","board_flash_map":6,"board_vendor":"seeedstudio","board_flash_spi_speed":40},{"board_flash_spi_mode":"QIO","board_builtin":{"FUNCTION_KEY":0,"STATUS_LED":2,"GROVE_POWER_SWITCH":15},"interfaces":{"A0":{"type":"ANALOG","pin":17},"UART0":{"pintx":1,"pinrx":3,"type":"UART"},"I2C0":{"pinscl":3,"type":"I2C","pinsda":1},"I2C1":{"pinscl":5,"type":"I2C","pinsda":4},"D0":{"type":"GPIO","pin":3},"D1":{"type":"GPIO","pin":5}},"board_name":"Wio Node v1.0","board_flash_map":6,"board_vendor":"seeedstudio","board_flash_spi_speed":40}]}}]}


This one will not work with Dweet since the payload size is greater than 2.000 characters.


{"this":"succeeded","by":"getting","the":"dweets","with":[{"thing":"my-wio","created":"2016-06-04T21:54:54.005Z","content":{"msg":"scanned 42 grove drivers at 2016-05-12 11:21:59.295065","result":"OK"}}]}


{"this":"succeeded","by":"getting","the":"dweets","with":[{"thing":"my-wio","created":"2016-06-04T21:55:52.127Z","content":{"type":"json","config":{"board_name":"Wio Link v1.0","connections":[{"sku":"101020019-ffff","port":"D0"}]}}}]}


{"this":"succeeded","by":"getting","the":"dweets","with":[{"thing":"my-wio","created":"2016-06-04T21:58:04.302Z","content":{"name":"AIOT","well_known":["GET /v1/node/GroveTempHumD0/humidity -> float humidity","GET /v1/node/GroveTempHumD0/temperature -> float celsius_degree","GET /v1/node/GroveTempHumD0/temperature_f -> float fahrenheit_degree"]}}]}


{"this":"succeeded","by":"getting","the":"dweets","with":[{"thing":"my-wio","created":"2016-06-04T21:59:07.684Z","content":{"celsius_degree":20}}]}


Below the JSON with the flows. You can copy and import to Node-RED.


[{"id":"d77c9afc.66f178","type":"inject","z":"2f43f52c.5f5eba","name":"email+password","topic":"","payload":"email=xxx@xxx&password=yyy","payloadType":"str","repeat":"","crontab":"","once":false,"x":146.10226440429688,"y":90.20169067382812,"wires":[["35cc64fc.0c5f3c"]]},{"id":"39f3afa1.0bfa4","type":"debug","z":"2f43f52c.5f5eba","name":"","active":true,"console":"false","complete":"true","x":887.0994110107422,"y":41.090911865234375,"wires":[]},{"id":"35cc64fc.0c5f3c","type":"function","z":"2f43f52c.5f5eba","name":"User Login","func":"msg.url=\"https://iot.seeed.cc/v1/user/login?\"+msg.payload;\nmsg.payload=\" \";\nmsg.method=\"POST\";\nreturn msg;","outputs":1,"noerr":0,"x":313.95738220214844,"y":90.87786865234375,"wires":[["a0a29e6.54e686"]]},{"id":"a0a29e6.54e686","type":"http request","z":"2f43f52c.5f5eba","name":"HTTP Request","method":"use","ret":"obj","url":"","x":523.0994110107422,"y":91.09091186523438,"wires":[["76d6cb8d.d7bcb4"]]},{"id":"1fa972fe.cad82d","type":"inject","z":"2f43f52c.5f5eba","name":"Fire","topic":"","payload":"","payloadType":"str","repeat":"","crontab":"","once":false,"x":125.99995422363281,"y":194.20172119140625,"wires":[["e82a22f.d7e69e"]]},{"id":"e82a22f.d7e69e","type":"function","z":"2f43f52c.5f5eba","name":"Node List","func":"msg.url=\"https://iot.seeed.cc/v1/nodes/list\"; \nmsg.method=\"GET\";\nmsg.headers = {\"Authorization\": global.get(\"user_token\")};\nmsg.payload=\"\";\nreturn msg;","outputs":1,"noerr":0,"x":313.8550720214844,"y":194.87789916992188,"wires":[["9b70d42a.11d4c8"]]},{"id":"9b70d42a.11d4c8","type":"http request","z":"2f43f52c.5f5eba","name":"HTTP Request","method":"use","ret":"obj","url":"","x":530.9970550537109,"y":194.0909423828125,"wires":[["c18e05ff.5ad8c8"]]},{"id":"cfd92133.b8422","type":"debug","z":"2f43f52c.5f5eba","name":"","active":true,"console":"false","complete":"true","x":777.0964508056641,"y":413.9801330566406,"wires":[]},{"id":"6852da9c.f3efc4","type":"function","z":"2f43f52c.5f5eba","name":"User Boards List","func":"msg.url=\"https://iot.seeed.cc/v1/boards/list\"; \nmsg.method=\"GET\";\nmsg.headers = {\"Authorization\": global.get(\"user_token\")};\nmsg.payload=\"\";\nreturn msg;","outputs":1,"noerr":0,"x":320.95448303222656,"y":271.7670593261719,"wires":[["2a30e96d.cf13a6"]]},{"id":"2a30e96d.cf13a6","type":"http request","z":"2f43f52c.5f5eba","name":"HTTP Request","method":"use","ret":"obj","url":"","x":532.0964508056641,"y":271.9801025390625,"wires":[["cfd92133.b8422","eddeb56c.30a548"]]},{"id":"e828c101.e7271","type":"function","z":"2f43f52c.5f5eba","name":"User Scan Drivers","func":"msg.url=\"https://iot.seeed.cc/v1/scan/drivers\"; \nmsg.method=\"GET\";\nmsg.headers = {\"Authorization\": global.get(\"user_token\")};\nmsg.payload=\"\";\nreturn msg;","outputs":1,"noerr":0,"x":320.95448303222656,"y":340.7670593261719,"wires":[["79a9a182.e4043"]]},{"id":"79a9a182.e4043","type":"http request","z":"2f43f52c.5f5eba","name":"HTTP Request","method":"use","ret":"obj","url":"","x":532.0964508056641,"y":339.9801025390625,"wires":[["eddeb56c.30a548","cfd92133.b8422"]]},{"id":"27a0aad2.8ce846","type":"function","z":"2f43f52c.5f5eba","name":"User Scan Status","func":"msg.url=\"https://iot.seeed.cc/v1/scan/status\"; \nmsg.method=\"GET\";\nmsg.headers = {\"Authorization\": global.get(\"user_token\")};\nmsg.payload=\"\";\nreturn msg;","outputs":1,"noerr":0,"x":323.95448303222656,"y":401.76708984375,"wires":[["6e5938c4.1591e8"]]},{"id":"6e5938c4.1591e8","type":"http request","z":"2f43f52c.5f5eba","name":"HTTP Request","method":"use","ret":"obj","url":"","x":530.0964508056641,"y":398.9801330566406,"wires":[["eddeb56c.30a548","cfd92133.b8422"]]},{"id":"6fdb1ba7.a01fc4","type":"function","z":"2f43f52c.5f5eba","name":"Node Config","func":"msg.url=\"https://iot.seeed.cc/v1/node/config\"; \nmsg.method=\"GET\";\nmsg.headers = {\"Authorization\": global.get(\"node_token\")};\nmsg.payload=\"\";\nreturn msg;","outputs":1,"noerr":0,"x":303.9545135498047,"y":493.76702880859375,"wires":[["b848318f.d6a42"]]},{"id":"b848318f.d6a42","type":"http request","z":"2f43f52c.5f5eba","name":"HTTP Request","method":"use","ret":"obj","url":"","x":534.0965118408203,"y":493.9801330566406,"wires":[["eddeb56c.30a548","cfd92133.b8422"]]},{"id":"ec87119f.0731f","type":"function","z":"2f43f52c.5f5eba","name":"Node .well-known","func":"msg.url=\"https://iot.seeed.cc/v1/node/.well-known\"; \nmsg.method=\"GET\";\nmsg.headers = {\"Authorization\": global.get(\"node_token\")};\nreturn msg;","outputs":1,"noerr":0,"x":321.8550567626953,"y":547.7670593261719,"wires":[["11ef70ee.f734df"]]},{"id":"11ef70ee.f734df","type":"http request","z":"2f43f52c.5f5eba","name":"HTTP Request","method":"use","ret":"obj","url":"","x":527.9970550537109,"y":548.9801330566406,"wires":[["eddeb56c.30a548","cfd92133.b8422"]]},{"id":"76d6cb8d.d7bcb4","type":"function","z":"2f43f52c.5f5eba","name":"Store user_token","func":"global.set(\"user_token\",msg.payload.token)\nreturn msg;","outputs":1,"noerr":0,"x":720.9516448974609,"y":89.78408813476562,"wires":[["39f3afa1.0bfa4","106b92ce.32fa4d"]]},{"id":"c18e05ff.5ad8c8","type":"function","z":"2f43f52c.5f5eba","name":"Store node_token","func":"global.set(\"node_token\",\"token \"+msg.payload.nodes[0].node_key);\nreturn msg;","outputs":1,"noerr":0,"x":724.0994110107422,"y":194.09091186523438,"wires":[["106b92ce.32fa4d","ad821c7c.a8c1f"]]},{"id":"f9597e64.eedbb","type":"inject","z":"2f43f52c.5f5eba","name":"Fire","topic":"","payload":"","payloadType":"str","repeat":"","crontab":"","once":false,"x":123.09939575195312,"y":270.9090881347656,"wires":[["6852da9c.f3efc4"]]},{"id":"81cc9ced.dea8","type":"inject","z":"2f43f52c.5f5eba","name":"Fire","topic":"","payload":"","payloadType":"str","repeat":"","crontab":"","once":false,"x":128.09939575195312,"y":340.9090576171875,"wires":[["e828c101.e7271"]]},{"id":"541385e7.66308c","type":"inject","z":"2f43f52c.5f5eba","name":"Fire","topic":"","payload":"","payloadType":"str","repeat":"","crontab":"","once":false,"x":127.09939575195312,"y":403.9090576171875,"wires":[["27a0aad2.8ce846"]]},{"id":"4d3c0e41.e1ab9","type":"inject","z":"2f43f52c.5f5eba","name":"Fire","topic":"","payload":"","payloadType":"str","repeat":"","crontab":"","once":false,"x":133.0994110107422,"y":494.9090576171875,"wires":[["6fdb1ba7.a01fc4"]]},{"id":"fffcf9c2.159ec8","type":"inject","z":"2f43f52c.5f5eba","name":"Fire","topic":"","payload":"","payloadType":"str","repeat":"","crontab":"","once":false,"x":133.0994110107422,"y":548.9090576171875,"wires":[["ec87119f.0731f"]]},{"id":"eddeb56c.30a548","type":"dweetio out","z":"2f43f52c.5f5eba","thing":"my-wio","name":"Dweet ","x":774.9515838623047,"y":365.9062805175781,"wires":[]},{"id":"4a72d4bd.dd359c","type":"function","z":"2f43f52c.5f5eba","name":"Grove Temperature","func":"msg.url=\"https://iot.seeed.cc/v1/node/GroveTempHumD0/temperature\"; \nmsg.method=\"GET\";\nmsg.headers = {\"Authorization\": global.get(\"node_token\")};\nreturn msg;","outputs":1,"noerr":0,"x":319.75563049316406,"y":610.8181762695312,"wires":[["f0eec6d0.24c798"]]},{"id":"f0eec6d0.24c798","type":"http request","z":"2f43f52c.5f5eba","name":"HTTP Request","method":"use","ret":"obj","url":"","x":525.8976287841797,"y":612.03125,"wires":[["c9304765.1d5a98","c9aa3db2.8f90a"]]},{"id":"319b9cb3.10f4a4","type":"inject","z":"2f43f52c.5f5eba","name":"Fire","topic":"","payload":"","payloadType":"str","repeat":"","crontab":"","once":false,"x":130.99998474121094,"y":611.9601745605469,"wires":[["4a72d4bd.dd359c"]]},{"id":"c9aa3db2.8f90a","type":"debug","z":"2f43f52c.5f5eba","name":"","active":true,"console":"false","complete":"true","x":787.0994110107422,"y":639.8181762695312,"wires":[]},{"id":"c9304765.1d5a98","type":"dweetio out","z":"2f43f52c.5f5eba","thing":"my-wio","name":"Dweet","x":784.9545440673828,"y":591.7443237304688,"wires":[]},{"id":"106b92ce.32fa4d","type":"dweetio out","z":"2f43f52c.5f5eba","thing":"my-wio","name":"Dweet ","x":902.0994110107422,"y":133.09091186523438,"wires":[]},{"id":"ad821c7c.a8c1f","type":"debug","z":"2f43f52c.5f5eba","name":"","active":true,"console":"false","complete":"true","x":893.9970550537109,"y":220.0909423828125,"wires":[]}]


Sunday, May 29, 2016

Wio Link and Node-RED

Here is a jewel for the enthusiasts of IOT: the Wio Link board. When used along with Node-RED we have a powerful IOT module that is easy to prototype and test.


This board was created by a talented young team from Seeedstudio. My respects to those brigth minds. They managed to create a product that is really , really and I mean really plug and play. This board overcomes the few hurdles of ESP8266 module.

The solution bundles many smart and handy features: (1) easy to add and change sensors and actuators by using the family of "plugable" Grove modules (2) quality circuit board with integrated USB and power regulator (3) download of configuration files via WIFI , also known as OTA - Over the Air configuration (4) Android and IOS apps to allow visual configuration of the modules (5) APIs exposed in a public server to allow Restful HTTP access to the data from sensors (6) fair prices (for the overall quality of the product) (7) configurations open sourced(8) Seeedstudio encourages the communitity of IOT enthusiasts and has opened a space in their web pages to allow people to show off ideas and projects thru "recipes". (9) Support for integrating Wio Link to IFTTT environment (something good for starters but contrained by the slowness of  IFTTT servers).


The operation of the board is performed by this sequence of three (easy) steps:

(1) Visual Programming (drag and drop) the Wio Link card

(2) Download configuration to Wio Link via WIFI (over the air)

(3) Command (read / write) your sensors via internet

Those three steps require connection to the internet. None of them can be done without internet access.

First things first....

Before you can start using your Wio Link and Grove modules there is a initial setup to be carried out. The purpose of this initial setup is to create a login in a public server and tell  Wio Link board what is the wireless network it has to connect as a client to have internet access. 

Guess how this initial setup will be done ?  Whoever designed this setup process certainly decided it should be simple and not rely on physical connection to Wio Link. How Wio Link could possibly know which wireless network to use , among many that are normally available,  and how to give Wio Link the SSID and password ?

Here comes the app. The whole idea is to allow the smartphone to connect to the Wio Link to sent the SSID and password of the wireless to be used.

The process is ilustrated on this page of Seeedstudio: click here

Seeedstudio also produced a short video, available in their site as well as in YouTube, that shows how to make the initial setup.


First the app will help you to sign up to the exchange server and register your node. Once this account is create you will be granted two different tokens that will be needed whenever you need to collect data from the sensors or command the actuators.


The second step in the process is to press the configuration buttom in the board for a period of 4 seconds. This will turn on the WIFI access point in the ESP8266 module. You will notice immediatelly that a new (and temporary) WIFI network will show up as available. The only purpose of this WIFI access point is to communincate a couple of information to your Wio Link (from your smartphone).


You then press the "GOT READY" buttom in the app and you will be asked to select what is the access point that should be used by Wio Link from now on. You will provide to the app the network SSID and the password. The app will forward this information to Wio Link over the temporary WIFI access point. When done Wio link will switch from access point mode (temporary wifi) to client mode of your wireless network.

Now the Wio Link uses the same network as your smartphone and both are able to reach the exchange server.


You have seen how the app helped to generate the intial setup for the board.

Now let me show you what the drag and drop visual interface of the app generates. The whole purpose is to come up with a JSON file that will guide the server on how to download the drivers to the Wio Link. The name of the file generate is : connection_config.json

This file has only two lines: the first one indicating the model of the board, in our case: "Wio Link V1.0" and the second one being a list of the Grove modules that we visualy connected to Wio Link, in below example: two modules (sku) attached to the ports UART0 and I2C.

{
"board_name": "Wio Link v1.0", 
"connections": [
    {"sku": "111020001", "port": "UART0"}, 
    {"sku": "101020050", "port": "I2C0"}
]
}


You can´t do any kind of programming logic on the app. Also the app has not a dashboard to present data in a more friendly and useful way. On the other hand the app can send pre loaded HTTP requests to the server to read and write values to the Grove modules. However this feature is too simplistic.

Here is where Node-RED comes into play. It can communicate with Grove sensors via HTTP, execute any logic you can think of and interface with your preferred dashboard to display data in a meaningful way.

This is what we will start doing in the next post...

See you then.

Sunday, April 10, 2016

Back to the basics - Installing Node-RED in Odroid (Part 1)

So far, I have been playing around with a cloud-based Node-RED framework (FRED) and a companion dashboard (Freeboard). Node-RED being the place where the logic is designed and tested. Freeboard being the graphic tool to display whatever might be relevant to the problem at hand (inputs, outputs, data from the web, etc). This  combination proved to be efficient for learning purposes and quick prototyping.

It is time now to focus on the a lower level since my main goal is to develop expertise on using Linux small computers as the brain of IOT control. I believe that, no matter how the sensors and remote devices get smarter, it will be always necessary to have a piece of hardware and software as the control center for an IOT solution.

I will document in this post how I have  installed Linux (Ubuntu), Node.JS and Node-RED on my  choice of  Linux computer, the ODROID computer from Hardkernel.


Board:


* Amlogic ARM® Cortex®-A5(ARMv7) 1.5Ghz quad core CPUs 
* Mali™-450 MP2 GPU (OpenGL ES 2.0/1.1 enabled for Linux and Android)
* 1Gbyte DDR3 SDRAM
* Gigabit Ethernet
* 40pin GPIOs + 7pin I2S
* eMMC4.5 HS200 Flash Storage slot / UHS-1 SDR50 MicroSD Card slot
* USB 2.0 Host x 4, USB OTG x 1 (power + data capable)
* Infrared(IR) Receiver
* Ubuntu or Android OS


eMMC Memory Module:

Ranging from 8GB to 64 GB. The module comes with Ubuntu image pre loaded.


What if you need  to update the OS of the eMMC Module ?  No worries since the below  eMMC Module Reader will allow you to connect the eMMC to an USB connection of your desktop computer or laptop  (via a card reader like shown below);


Case:

For safety and easy of use the board is housed in a customized box by hardkernel:


WIFI


IEEE 802.11b/g/n 1T1R WLAN module with Antenna. 

The Realtek RTL8188CUS-GR is a highly integrated single-chip Wireless LAN (WLAN) USB2.0 network interface controller compatible with the 802.11n specification. It combines a MAC, a 1T1R capable baseband, and RF in a single chip. The RTL8188CUS provides a complete solution for a high throughput performance wireless client. 


Power supply:

AC 100~240 Volt input 
DC 5Volt / 2A output Switching mode power adaptor EU / Korea compatible Plug specification : inner(positive) diameter 0.8mm and outer(negative) diameter 2.5mm 
The PSU's plug has 4.8mm round contacts. If your location uses a different socket (such as a 4.0mm EU-style plug, Australian socket, etc.) an adapter may need to be obtained by you.


Video: